Roasted Panzanella

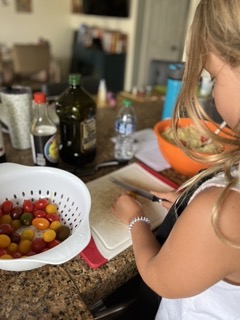
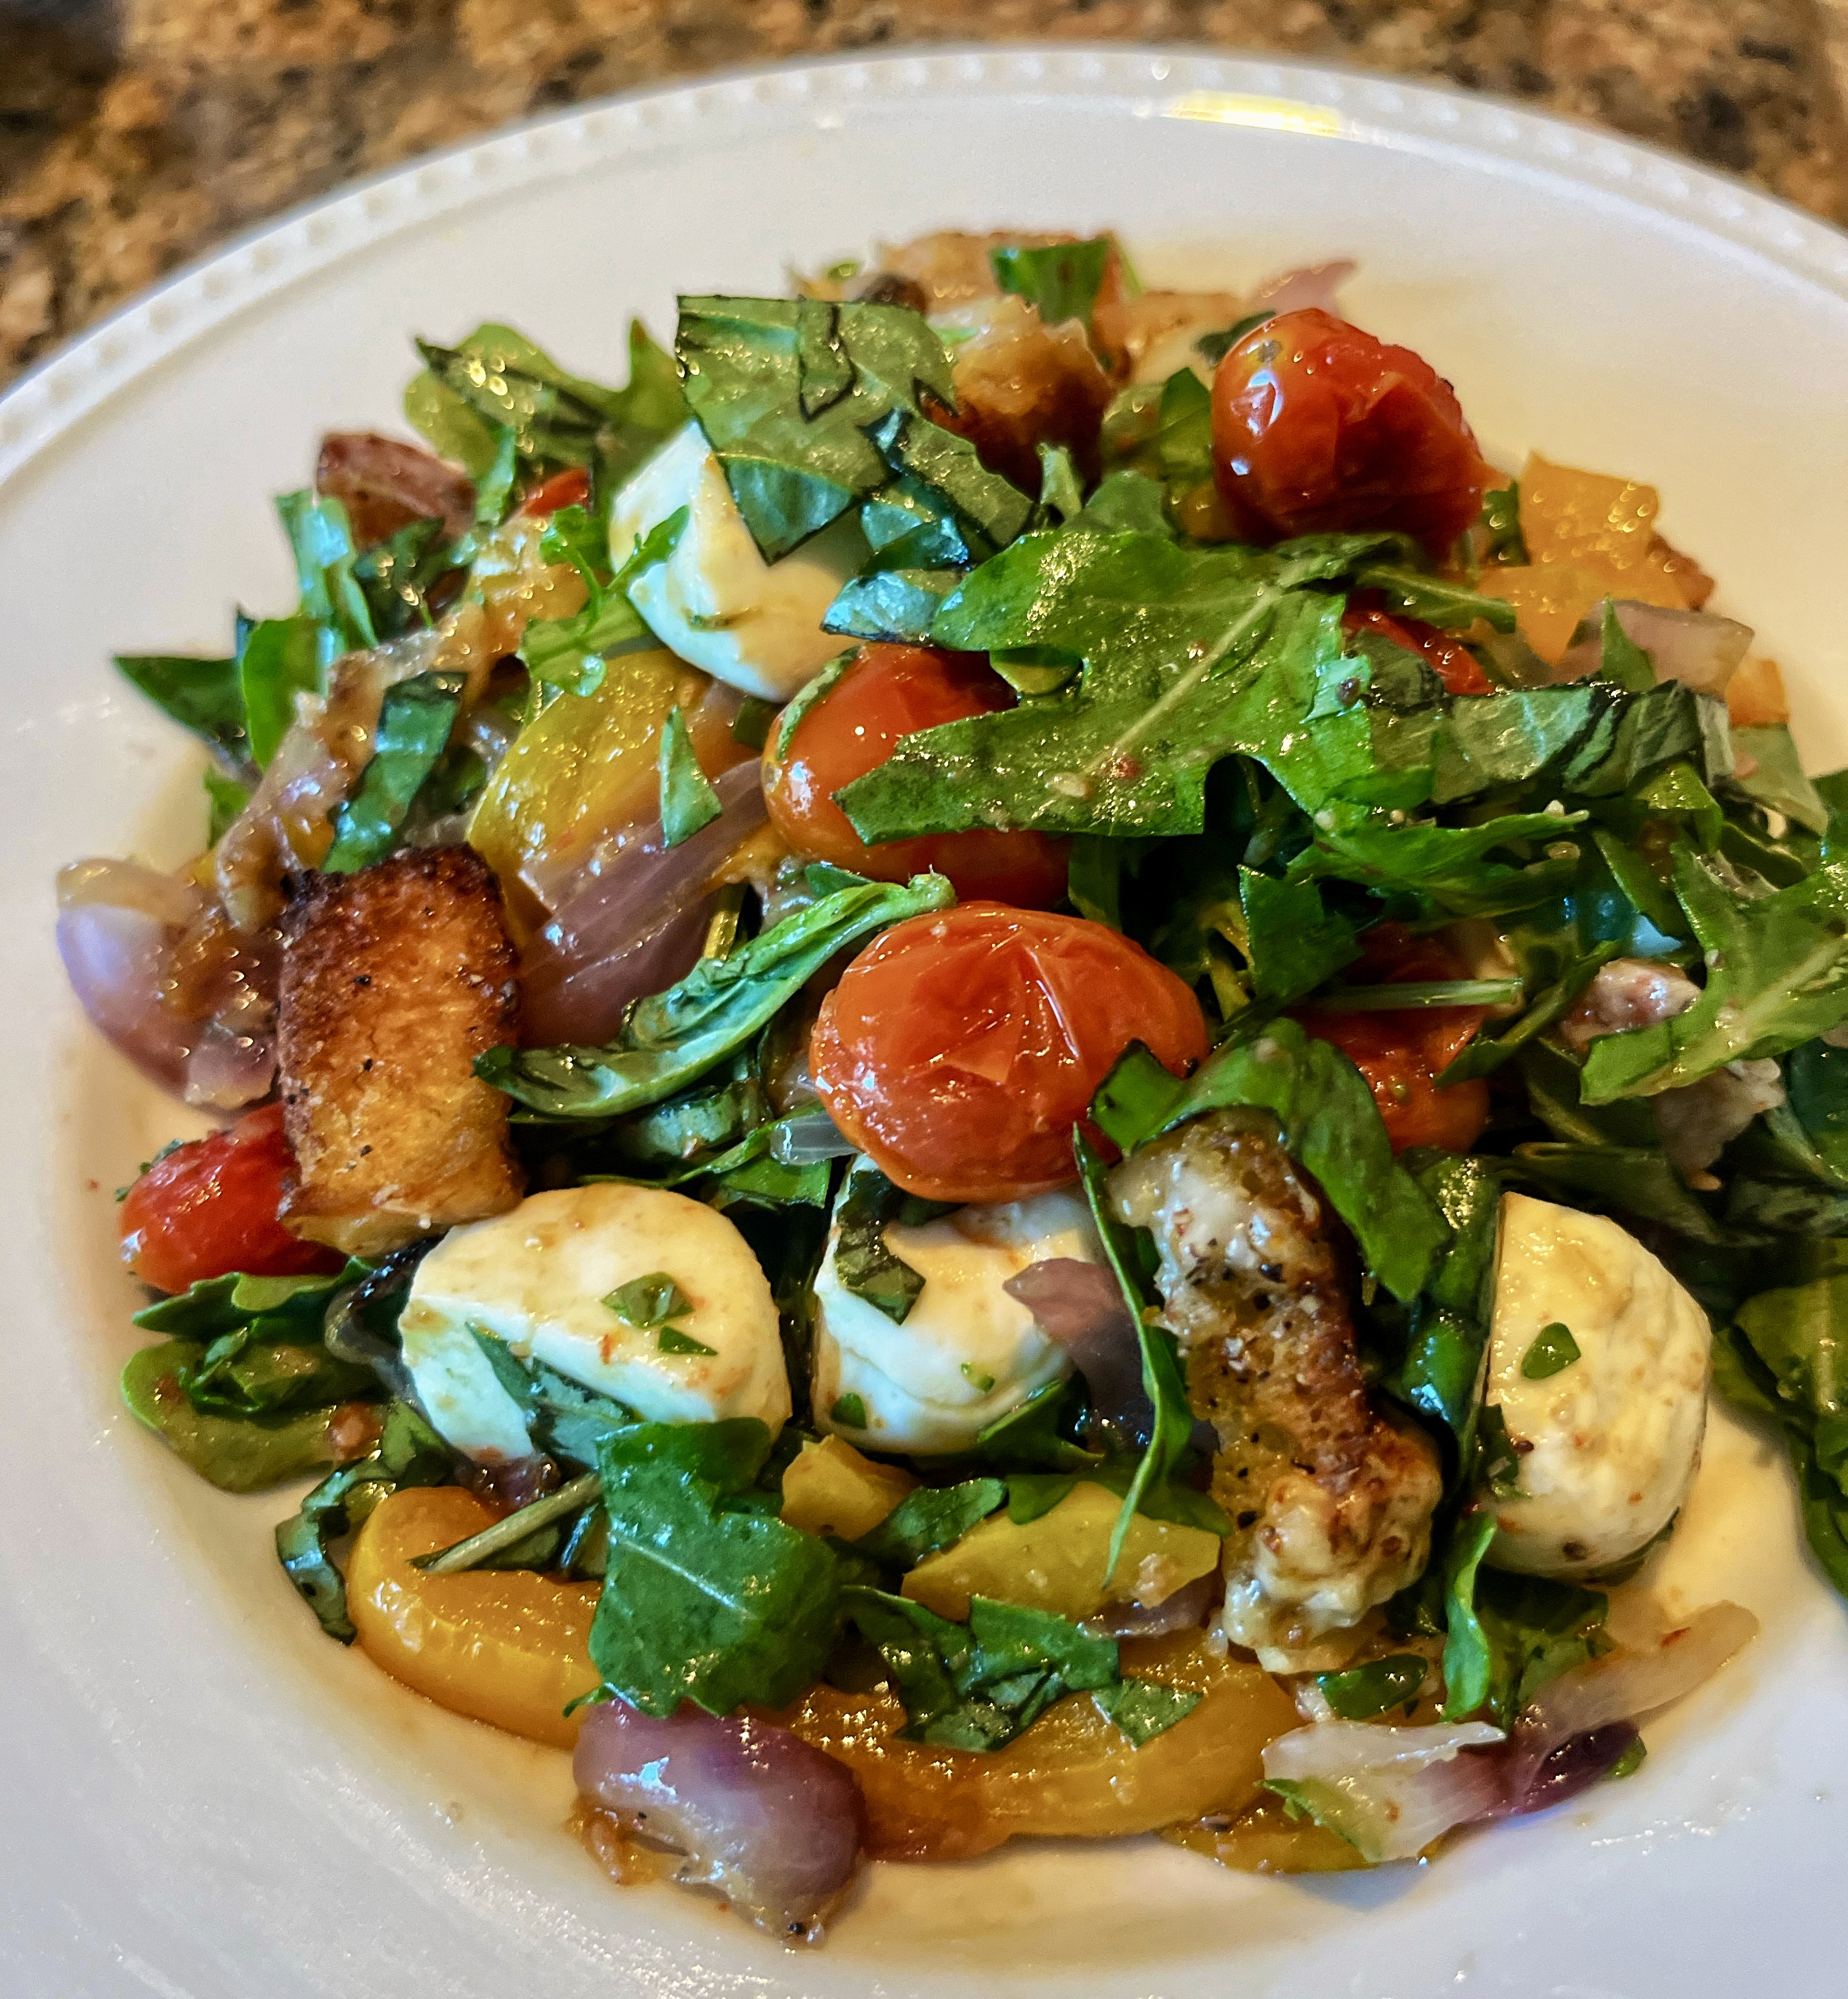
I had so much basil sitting on the counter. I always buy some not knowing if what I have at home is still good and then I get home to see that it is and now I have all this basil to deal with, first world problems. Not wanting to make pesto or have Caprese, again, I decided on a Panzanella salad. However this time I wanted to roast the veggies because, no Caprese again. This recipe is super easy and you’re left with very few dishes, always a win. But you guys, it’s soo good, I mean it’s basically a deconstructed pizza.

INGREDIENTS

8 oz. French or Italian bread, about 5 cups, cut into 1″ pieces

12 oz. cherry tomatoes

1 small red onion, halved and thinly sliced

1 small red, yellow or orange bell pepper thinly sliced.

10 cloves of garlic, peeled.

1/2 c. extra-virgin olive oil, divided

Kosher salt

Freshly ground black pepper

1/2 c. shaved parmesan

8 oz. small fresh mozzarella balls (ciliegine or bocconcini)

2 c. packed baby arugula

1 c. packed fresh basil leaves 

2 Tbsp. red wine vinegar

DIRECTIONS

Preheat oven to 400°F. On a rimmed and lined baking sheet, toss bread, tomatoes, onion, bell pepper and garlic with 6 tablespoons oil, ½ teaspoon salt, and several grinds black pepper. Shake the sheet to arrange everything in an even layer.

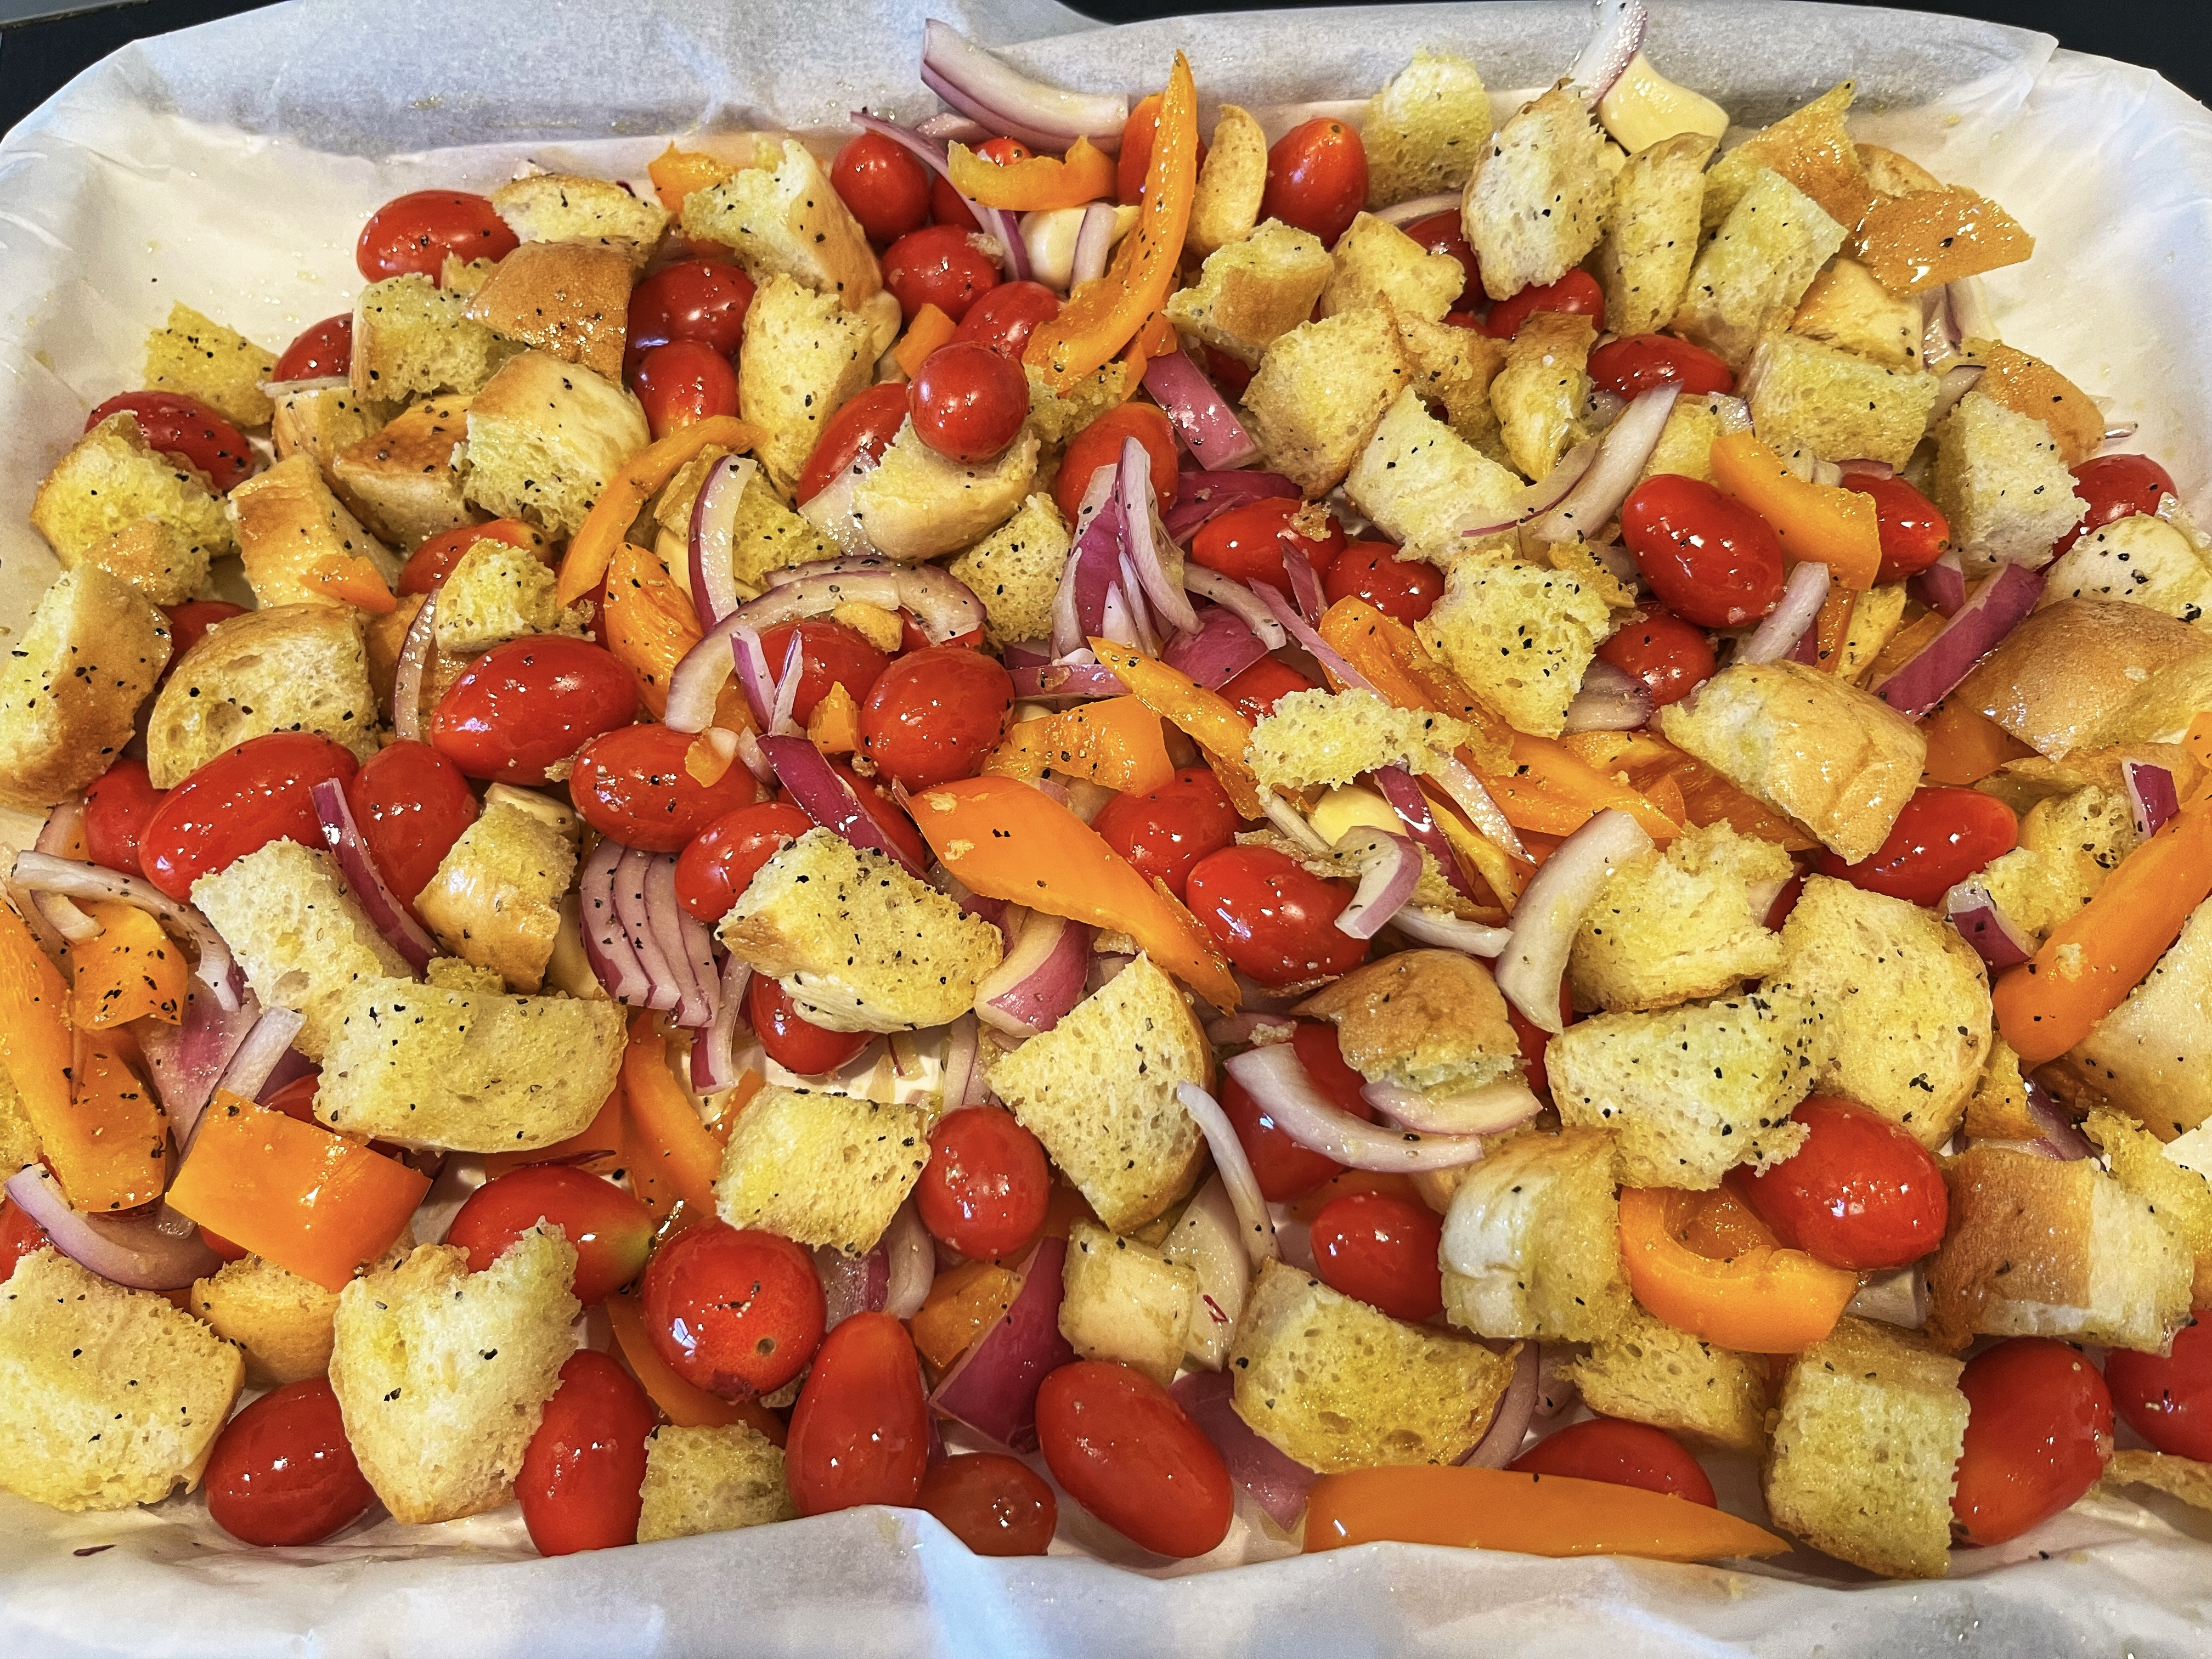
Bake, shaking the sheet halfway through, until bread begins to turn golden, 10 to 15 minutes.

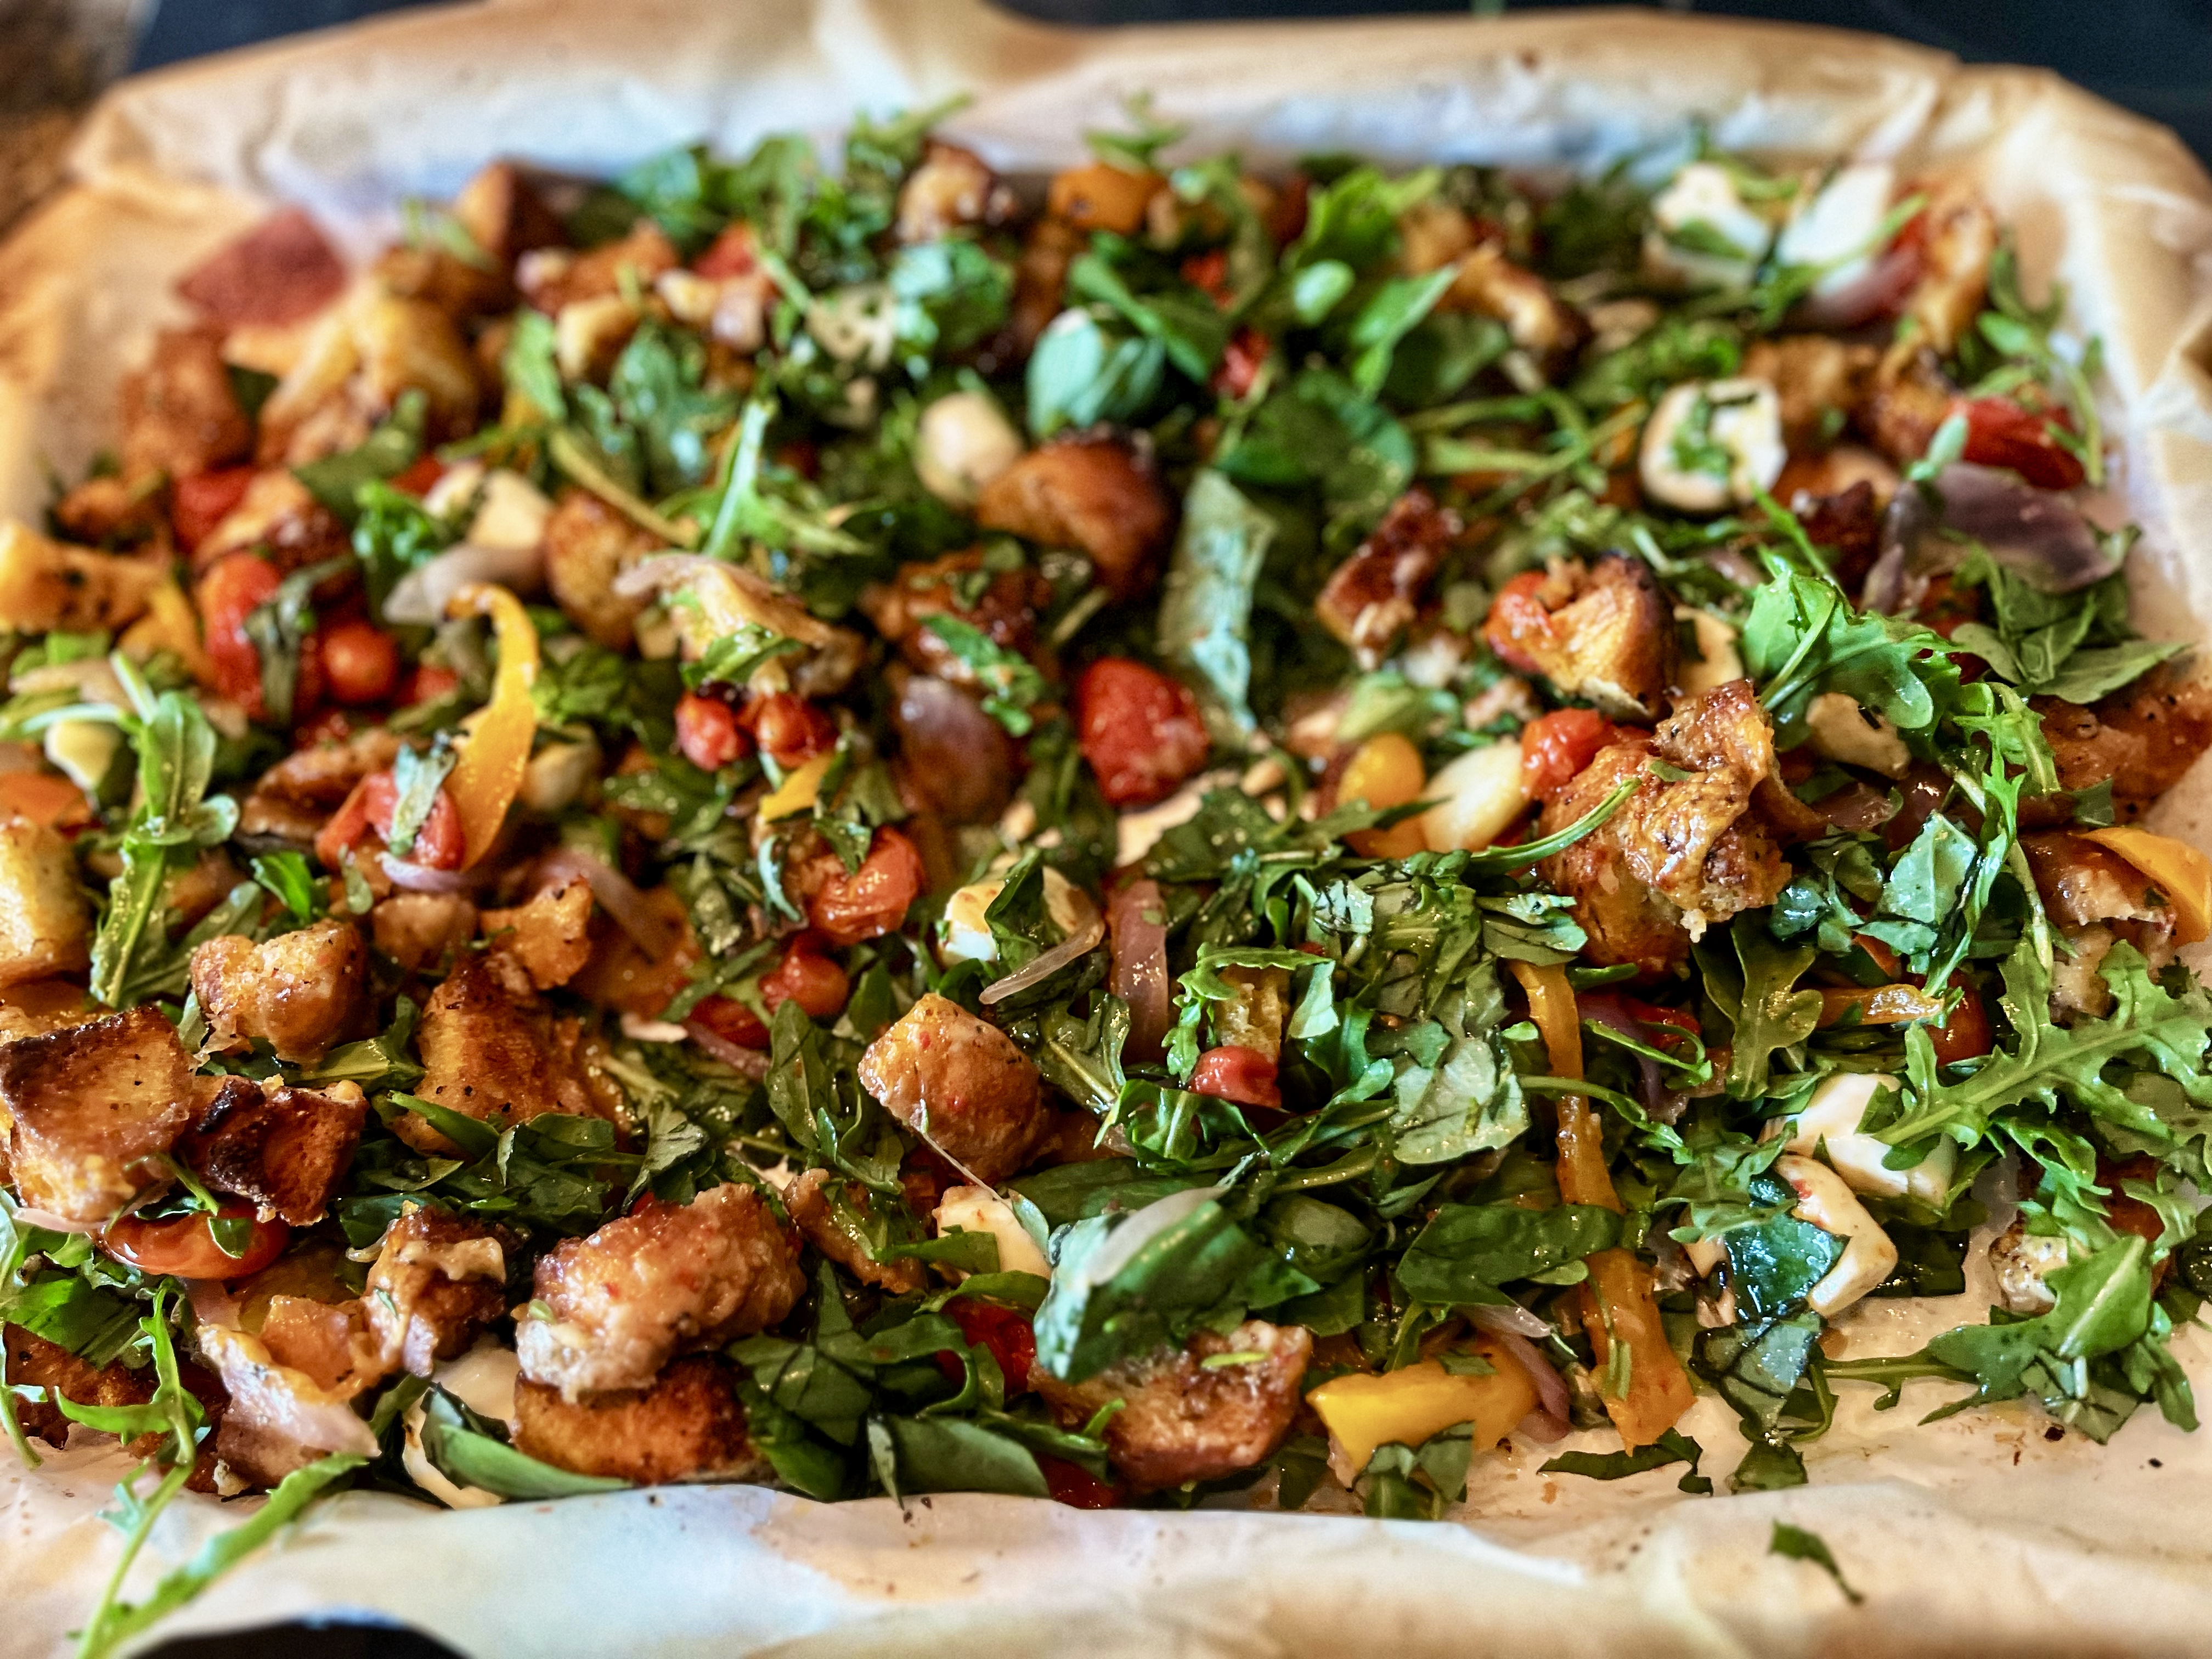
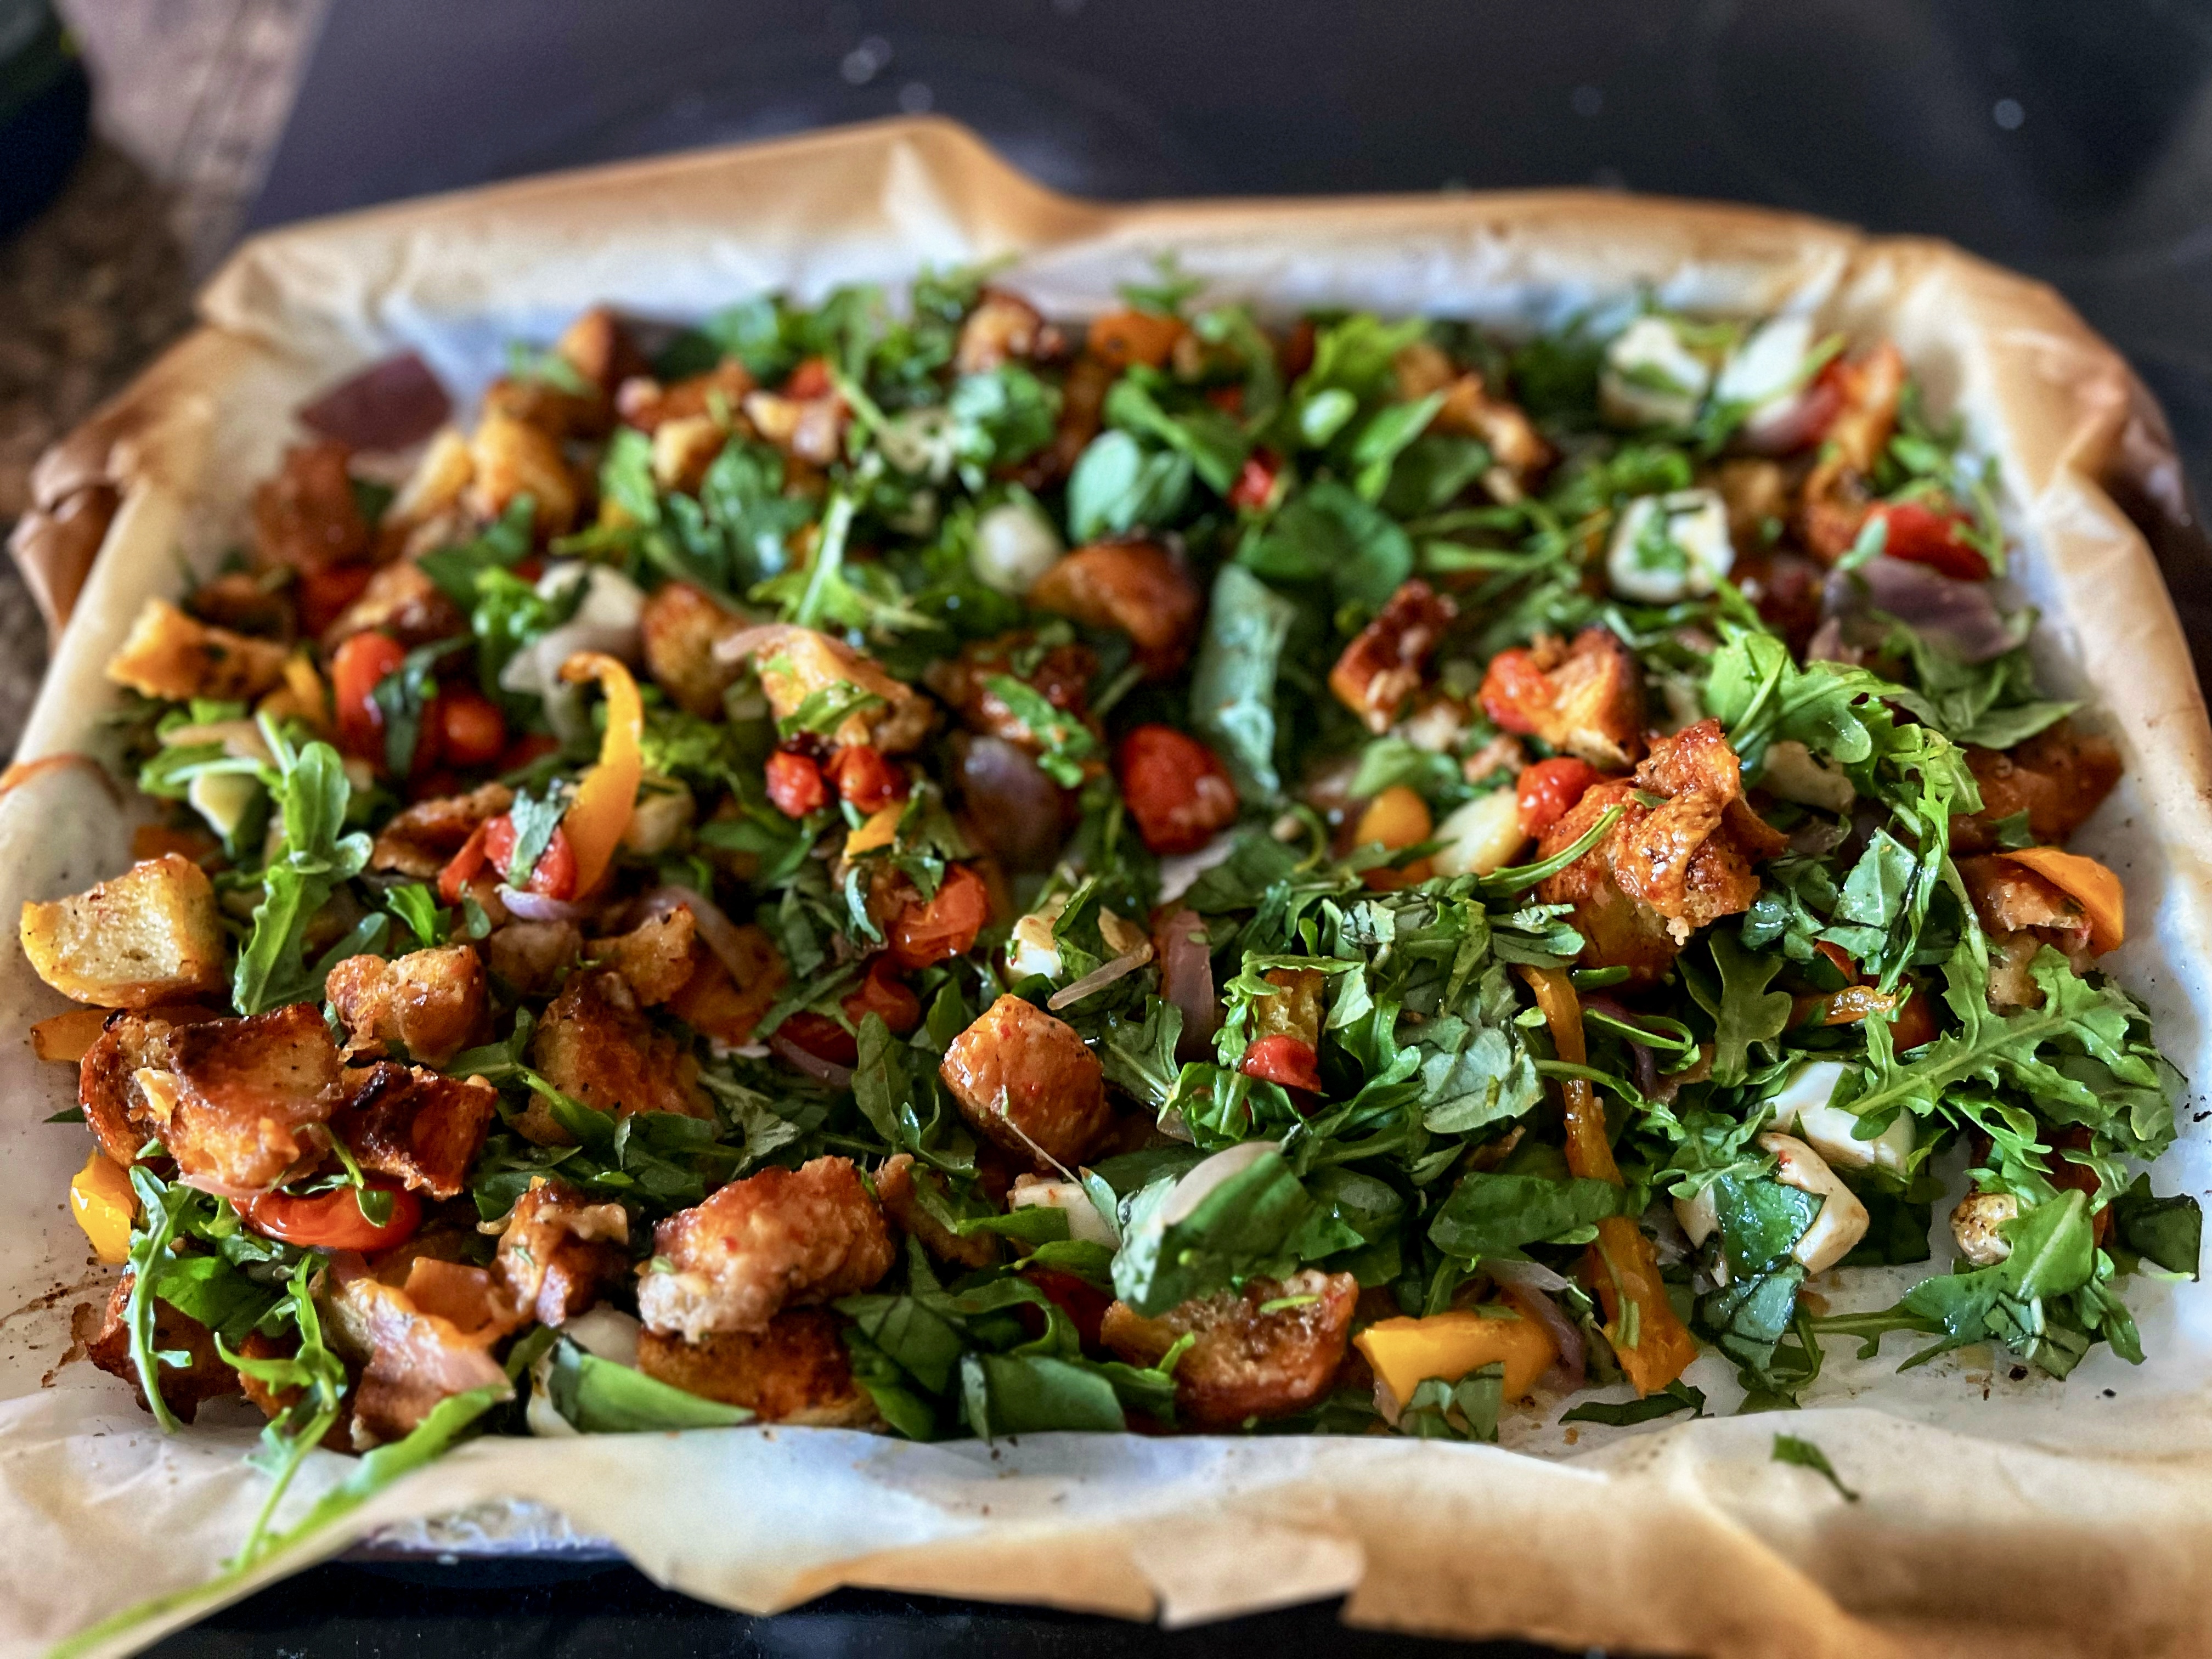
Scatter the Parmesan over everything and continue to bake until tomatoes burst and bread is golden brown, 8 to 10 minutes longer.

Remove sheet from oven and let cool slightly, about 10 minutes. Add mozzarella, arugula, and basil to sheet pan. Drizzle with vinegar and remaining 2 tablespoons oil, season with ½ teaspoon salt and toss to combine, scraping up any melted bits from the sheet. Serve hot.

*Recipe adapted from Delish.com

Mandarin Orange, Olive Oil & Cardamom Cake

This is a simple and delicious cake. Not too sweet with warm notes of cardamom, it’s definitely a good back pocket dish to pull out for your next gathering.

INGREDIENTS

1 cup extra virgin olive oil, plus extra for the pan

2 cups all-purpose flour, extra for dusting the pan

1 teaspoon kosher salt

1 teaspoon baking powder

¼ teaspoon baking soda

1 teaspoon ground cardamom

1 ½ cups plus 2 Tablespoons granulated sugar

3 large eggs

Grated zest of 5 mandarin oranges

2 Tbs of fresh mandarin orange juice

1 ¼ cups whole milk

2 tablespoons sifted confectioners’ sugar, for garnish

*candied orange slices for garnish is optional

DIRECTIONS

Preheat the oven to 350°F.

Grease a bundt cake pan with a little olive oil and dust with a bit of the flour, shaking out the excess.

In a medium bowl, whisk together 2 cups flour, salt, baking powder, and baking soda.

In a large bowl, combine the 1 ½ cups granulated sugar, cardamom, and eggs. Using an electric hand mixer set on high, beat the mixture until thick and fluffy, about 5 minutes While the mixer is running, slowly drizzle in the olive oil and beat until incorporated. Reduce the speed to low and add half the orange zest, the orange juice, and milk. Beat until smooth.

Add the flour mixture to wet ingredients and mix on low just until you have a uniform batter.

Pour the cake batter into the prepared pan and sprinkle the top with the remaining 2 tablespoons granulated sugar.

Bake the cake for 40 to 45 minutes, or until the center is set.

Allow the cake to cool for 30 minutes in the pan,

 Before serving, dust the cake with powdered sugar and sprinkle with orange zest or candied orange slices.

Spanish Tortilla

The Spanish tortilla or Spanish omelet is an essential dish in Spain. I am sure if you’ve ever been out for tapas here or in Spain, then you’ve seen it on the menu.

My mom spent three months in Santander, Spain back in 1997 and when she came back she would make this for us, to rave reviews. It is delicious. It has been off my radar until I was watching either Top Chef or Ciao House where they were discussing the tortilla, I wasted no time texting my mom asking for her recipe. She didn’t have her original one anymore but she sent me a recipe that looked closest to what she remembered making.

I actually happened to have all the ingredients on hand..We’ll call that food fate.

I used this recipe.

In a nut shell…it’s easy to make and only calls for five ingredients, potatoes, eggs, onions, olive oil and salt.

Peel and thinly slice about a pound of potatoes ( I think I used four yellow potatoes), then do the same to one medium onion ( I used a sweet onion, which I think is better for this recipe). Heat the olive oil in a nonstick pan until it’s hot and then add the potatoes and onion. Cook for about 20ish minutes, stirring and turning them until they are soft. Meanwhile whisk four eggs in a large bowl and add a good pinch of salt (I also added a few grinds of fresh pepper). Next you’re going to add the potatoes and onions and stir to incorporate them.

Reheat the same pan and add some more olive oil. Pour in the tortilla mixture and swirl the pan as you would an omelet. Cook 6 to 7 minutes until egg is set.

Take the tortilla out of the pan and put the cooked side on a plate. Flip the pan and place it on top of the tortilla as a lid. Flip the plate and pan together to flip the egg in the pan. Cook the other side for another 6 to 7 minutes.

You can eat it right away or wait and enjoy it at room temperature. It’s good any time of day and I like to add a few dashes of Tabasco to mine, Tabasco and eggs are meant to be.

I hope you try it, you wont be disappointed.

46

Consistency is not my strong suit when it comes to this blog, I’m sorry. I have excuses, are they good, probably not so I wont bother with the whys.

I went to an ECE (early childhood education) beach retreat and it was a really great experience. There is no end in learning how to create new and challenging learning environment.

I also had a birthday, sigh. Turns out I am older than I thought. 46 WTF?

I was spoiled with pressies, cake, balloons….and tacos!

We went out to dinner and had a nice meal, cake pop for the win!

Not about food:

The girls are new aunties to two pups. Let me introduce to you Tony and Frankie, brothers rescued from TJ who now live their best life in Coronado.

And have dog sitters willing and waiting.

Gosh, aren’t they getting too big? Make it stop!

Crispy Baked Boursin with Hot Honey

Has this recipe been taunting you on social media like it has us? Hello food porn. Boursin, good…crispy, good. hot honey, gooood…all together, sensational!

Super simple to throw together, this would be perfect for a quick appetizer, or for dinner. We had it with sliced French baguette, some toasted with evoo and some not. It was delicious.

Hot honey can be found on shelves anywhere these days, because it’s so good… on everything. But for this I just heated up some honey and red chili flakes so I could control how spicy I wanted it and I wanted it HOT!

Ingredients

Boursin cheese (garlic and herb)

2 Tbs flour

1 egg, beaten

1 cup panko breadcrumbs (seasoned with salt and pepper)

salt and pepper

TO SERVE-

Hot honey

Bread or crackers of your choosing

Directions

Preheat oven to 300 degrees.

Place the flour, the beaten egg and seasoned panko breadcrumbs into three separate bowls.

Coat the Boursin first in the flour, and make sure that the cheese is completely coated. Dust off any excess flour and then dip in the egg, once again ensuring it’s well coated. Finally coat in the panko breadcrumbs.

Place the crumbed cheese on a parchment-lined baking sheet.

Place in the preheated oven and allow to bake for 10-15 minutes or until golden brown and crisp.

While the cheese bakes, make your hot honey with honey and diced chilies, or honey and crushed red pepper or your favorite store bought hot honey. Whatever way you go, just heat it up in the microwave or a small sauce pan. Also, prepare your French bread for serving. Thinly slice the baguette and place on a baking sheet. Drizzle with olive oil and bake until crisp and golden on both sides. 

Once the cheese has baked and looks golden brown, remove from the oven.

Serve on a plate, drizzle with the hot honey and toasted bread. Serve additional honey on the side because you will want more!

Enjoy!

Snickerdoodle Sandwich Cookies with Cream Cheese Filling

Snickerdoodle’s are not my favorite cookie, not even in my top five. So when I made this recipe, I did not think I would want them for breakfast, however paired with cream cheese frosting, they are suitable for any time of the day. With Christmas a short few days away, these are perfect to have out for little and big hands to grab.

I made these a few times, once from scratch and then I used a sugar cookie mix as a short cut and it’s just as good. Since time is minimal these next few days, get the mix and make it easy on yourself. But you do have to make the cream cheese frosting, that is a must.

INGREDIENTS

1 package of sugar cookie mix

8 oz cream cheese, room temperature

1/2 cup butter, room temperature

1/4 teaspoon salt

1 teaspoon vanilla

2-4 cups powdered sugar (depending on your sweet tooth)

DIRECTIONS

Heat oven to 350 degrees. Line backing sheets with parchment paper.

Mix the cookie dough according to the package directions. Using a 1/2-inch cookie scoop or spoon, scoop cookie dough and roll into balls. Roll the dough in the cinnamon-sugar and then place on the prepared baking sheets. Bake for 8-10 minutes.
Let cool completely.

While the cookies bake and cool, make the cream cheese frosting.

In a stand mixer or a bowl with a handheld mixer; beat cream cheese and butter until light and creamy. Add salt and then gradually add the powdered sugar, beat until smooth.

Once the cookies are cool, spread frosting on the bottom half of the cookies, top with remaining cookies and press gently together so the frosting spreads to the edges.

Store in an airtight container. They are good out of the fridge too!

Cravings Broccoli Salad with Cashew Dressing

She had me at cashew dressing.

This recipe is out of Chrissy Teigen’s 3rd cookbook, Cravings All Together and it’s a solid five stars. Instead of the traditional mayo dressing with bacon, which is obviously delicious, we make a dressing out of cashews to dress the broccoli. And the dressing is the star of the dish, it’s so good. It’s sort of like a satay peanut sauce but not… actually now that I think about it, I am going to make this dressing to dip chicken in.

It’s a little sweet, a tad spicy, crunchy, nutty and creamy an easy and delicious salad that almost hits all of the five flavor elements.

Plus it’s dairy and gluten free if that’s your thing.

INGREDIENTS (serves 4)

2 medium heads of broccoli, trimmed and separated into florets (about 6 cups)

Kosher salt

1 cup chopped salted roasted cashews

3 garlic cloves, smashed

1/2 teaspoon toasted sesame oil

2 Tablespoon unseasoned rice vinegar

1 1/2 tablespoons sugar

1 teaspoon finely diced jalapeño pepper (preferably red, with seeds)

2 teaspoons light soy sauce

1 teaspoon fish sauce

1/4 cup thinly sliced

1/4 cup sweetened dried cranberries

DIRECTIONS

Place 1 1/4 cups of water in a 5 quart saucepan and bring to a boil over high heat. Add the broccoli, cover with a tight fitting lid, and steam until broccoli turns bright green but is still tender-crisp, about 3 minutes. Drain and then spread the broccoli in a single layer on a paper towel-lined plate to cool. (Don’t place in an ice bath, that will create soggy broccoli) Season the broccoli with the salt.

While the broccoli is cooling, make the dressing. Combine 2/3 cup of the cashews with the 1/3 cup vinegar, sugar, jalapeńo, soy sauce and fish sauce in a blender until smooth and creamy, about 1 minute; add water by the dressing if it’s too thick.

Arrange the broccoli on a large plate or platter, then scatter the onions and cranberries on top. Drizzle 1/2 cup of the dressing over the broccoli, then scatter the remaining 1/3 cup cashews over the salad. Serve the remaining dressing on the side.

Spooky

We kicked off the spooky season with my first visit to Knott’s Scary Farm.

We went straight to an amazing looking roller coaster. The lights were all lit up and it looked like a boardwalk. The ride was so fun we did it multiple times. The downside, the exit took us into clown alley. Yes, I know that I am an adult, but I have an irrational fear of clowns…sigh, I am not proud. It took all that I had to not look them, even when they came running at me head on…Otherwise I would have cried.

We had a such good time, rides at night are just better. Parts of the park were very dark and creatures of all sorts would follow us around breathing down our necks and jump out at us. A lot of them had on shoes with metal taps so when they ran and slid at you, it made an awful sound..basically scaring the shit out of us at every corner we turned.

We were walking through a very dark area with fog machines clouding our path when we realized why so many people run in the wrong direction in horror films. You know how we scream at those idiots? Well, we were them…We had a hard time figuring out where we were and where we were headed. If was legit in danger, I would have just fell to the ground and succumbed to my death.

However, it was fun and definitely something to do again.

The girls had fun at the store trying on masks.

We hit the pumpkin patch and we made it easy on ourselves this year. We went to one in Temecula, gave the girls some money, grabbed a glass of wine, and hung out while they did all of the things. Petting zoo, panning for gems, snow cones and all of the other shit that is a waste of money.

We no longer buy our pumpkins at the actual patch which saves a lot of money. We just grab them at a local store on our way home, the girls don’t care.

Then we carve them and then they die. {the pumpkins, not the girls.}

Luckily we got a few photos of our artistry before they wilted 20 minutes later.

The next day we made Oreo bats and I realized that the girls are almost too old for these food crafts. They just want to eat the ingredients rather than create. However, I MADE THEM HAVE FUN!

These are super simple using only 3 ingredients.

Oreos, bite size Reese’s and candy eye balls. We used the oreo filling as the glue for the wings and the eyes. Pop them into the fridge for 10 minutes to set or don’t and just eat them right away.

I think they turned out cute!

The girls have their costumes and we are excited to take them out Monday night, and then go right home to inspect their candy! {aka take all the good stuff}

Just kidding, we will wait until they are in bed.

The One and Only Crab Cake Recipe

Ironically, two days after I post about the only crab cake recipe one needs, I see this on Instagram.

So…. I figured it was a sign from the chef’s to post this. Honestly it’s so easy and delicious, you won’t look back.

*Recipe from Chef Andrew Zimmern

1/2 cup mayonnaise

1 large egg, beaten

1 tablespoon Dijon mustard

1 tablespoon Worcestershire sauce 

1/2 teaspoon hot sauce

1 pound jumbo lump crab meat, picked over

20 saltine crackers, finely crushed

1/4 cup canola oil

Lemon wedges, for serving 

Homemade remoulade/tarter sauce or your favorite store bought brand.Walmart Logo

DIRECTIONS

In a small bowl, whisk the mayonnaise with the egg, mustard, Worcestershire sauce and hot sauce until smooth.

In a medium bowl, lightly toss the crabmeat with the cracker crumbs. Gently fold in the mayonnaise mixture. Cover and refrigerate for at least 1 hour.

Scoop the crab mixture into eight 1/3-cup mounds; lightly pack into 8 patties, about 1 1/2 inches thick. In a large skillet, heat the oil until shimmering. Add the crab cakes and cook over moderately high heat until deeply golden and heated through, about 3 minutes per side. Transfer the crab cakes to plates and serve with lemon wedges.

  • These can be made ahead, formed or not, for up to a day.

Cowboy Pasta Salad

This pasta salad is truly addicting. When I read the ingredients for the dressing, I wasn’t expecting it to be as good as it was. Creamy, tangy, sweet and as spicy as you’d like depending on if you’re feeding adults or children…or adult children.

The girls and I made this again at home. I went a bit heavier on the heat by also adding some cayenne pepper. I thought about adding some bacon, but honestly it’s good as vegetarian side dish.

We had it for dinner, it’s just as good as the first time.

The next day, I tore some arugula and added it to the pasta salad. I suggest trying this too!

Cowboy Pasta Salad

Ingredients

1 lb. bowtie pasta

Olive Oil

1/2 cup mayo

1/4 cup your favorite bbq sauce

1 tbs spicy brown mustard

1 tbs Worcestershire sauce

1-2 tsp of your favorite hot sauce

2 ears of fresh corn

2 cups cherry tomatoes

8 oz. cheddar cheese, grated

8 scallions, chopped

Salt and pepper, to taste

Arugula, if you want.

Directions

Bring a large pot of water to a boil. Cook pasta per box instructions, drain in colander.

Put cooked pasta in a large bowl and drizzle with evoo, so the pasta doesn’t stick together, set aside.

Husk the corn and cut kernels off the cobs. Add corn to pasta.

Halve the tomatoes, add to pasta.

To make the sauce, whisk the mayo, bbq sauce, mustard, Worcestershire sauce and hot sauce in a medium bowl until combined. Add the sauce to the pasta, tomatoes and corn, toss to combine.

Finely chop the green onions, add to pasta. Top with the grated cheddar cheese.

Taste for salt and pepper.

Enjoy!